

How To Make Your 3d Animation Characters Look 2d
Combining real-earth video with 2nd animations and cartoon backgrounds is a blending of styles that can make your project stand out. With the help of Drawing Animator,importing your video into 2nd animated backgrounds couldn't be easier!
Cartoon Animator provides a simple way of exporting your 2D background footage with an blastoff channel.This gives your exported video transparency, which you lot can and so use with layered elements on acme of each other to create your video. In this tutorial you'll learn how to combine live and animated alpha aqueduct video using Adobe Subsequently Effects.
What You'll Learn in This Compositing Tutorial
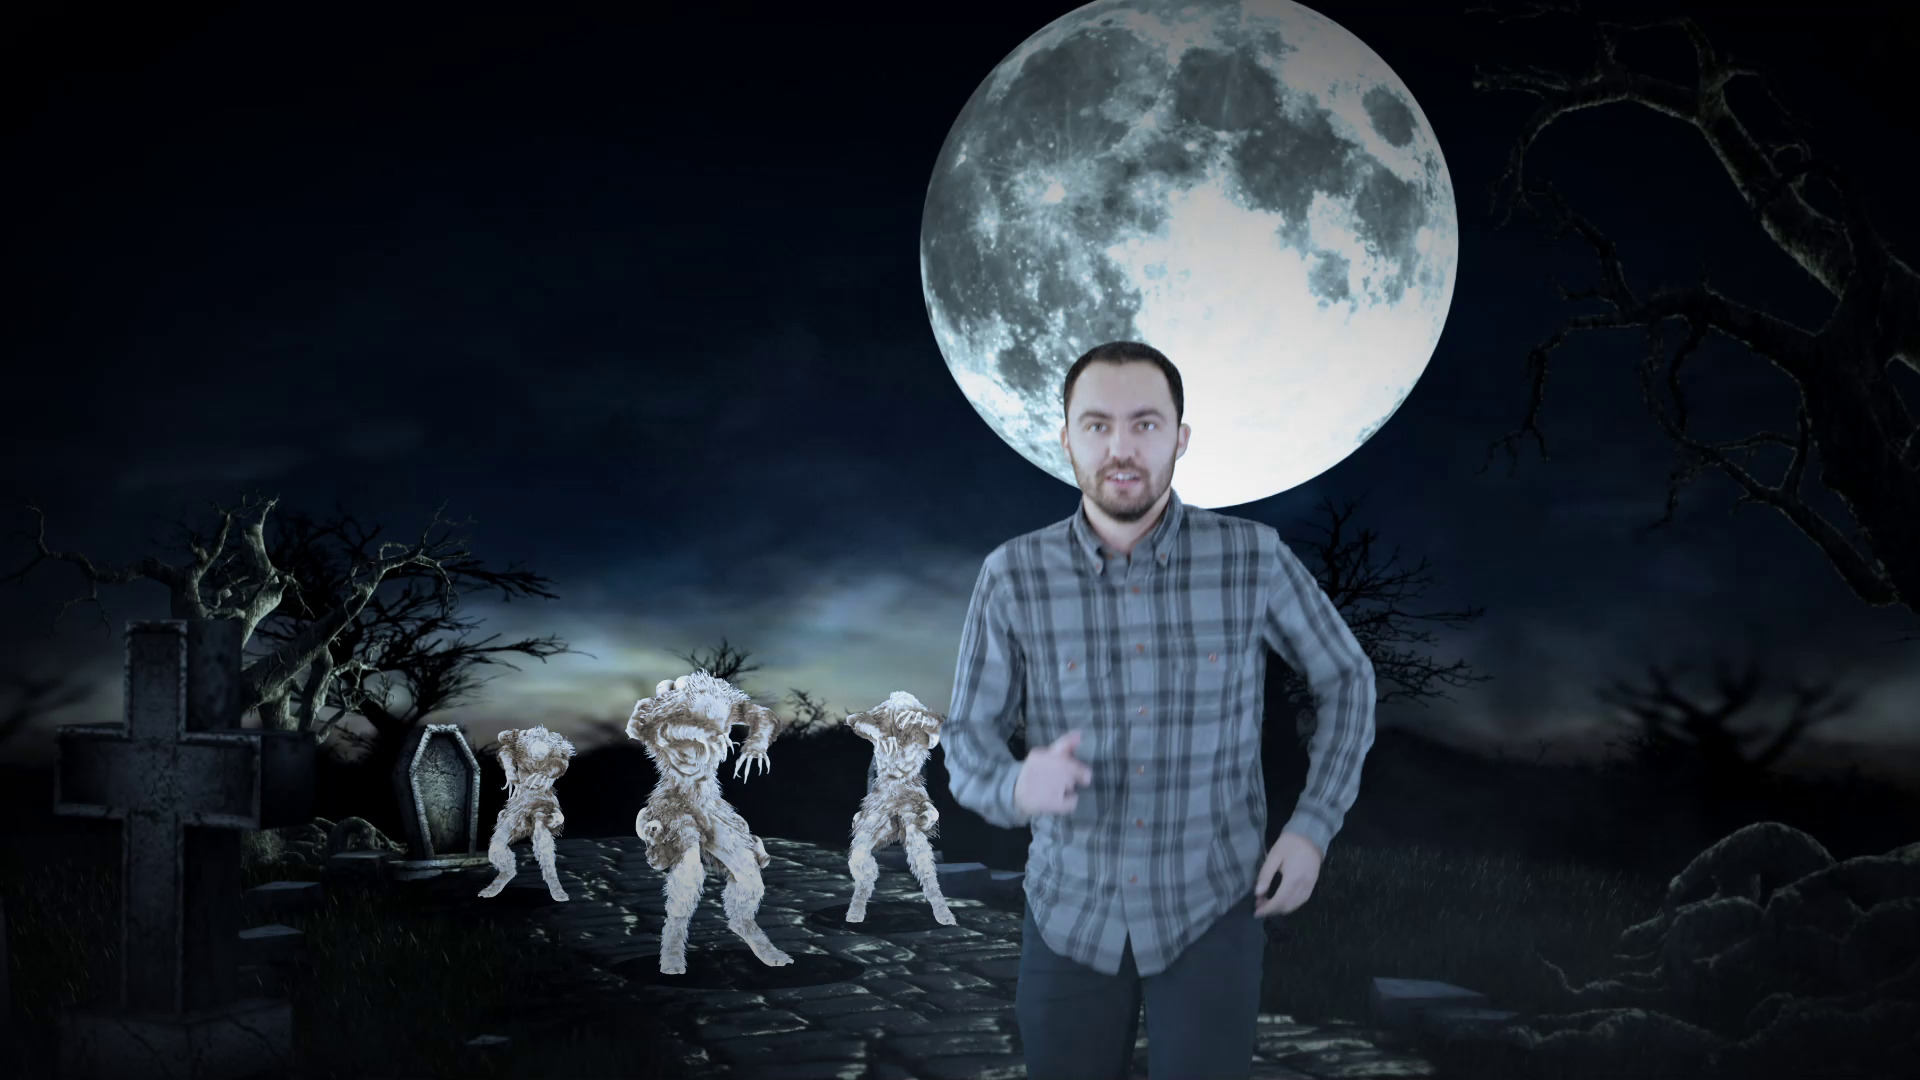
In this tutorial nosotros volition show yous stride-by-step how to merge a alive activeness character into a 2D cartoon groundwork created using Drawing Animator. It's most Hallowe'en, and so nosotros're making a fun and spooky monsters' graveyard themed instance.
Topics we cover volition include:
- How to export a 2D cartoon groundwork with an alpha channel
- How to import the video files and combine the different styles in Adobe After Effects
- How to use adjustment layers to alloy the alive activeness footage with the 2d cartoon groundwork
- How to create a 2D scene with 3D depth in Cartoon Animator to create 3D parallax effects
What You'll Need
To follow forth with this tutorial yous will need your own version of Adobe After Effects and Drawing Animator. You tin download a free trial version for Cartoon Animator on the Reallusion Website.
Y'all will also need a live activity video, such as the ones linked beneath from Envato Elements. The person or object in the video needs to have have an alpha channel, or transparent background, which is usually filmed on dark-green screen to make compositing easier. The 2nd cartoon background can be purchased from Reallusion's content store for utilise in Cartoon Animator.
Follow Along With Our Stock Avails
Or you can click on the links beneath to download the sames file nosotros've used in this tutorial:
- Halloween Groundwork - this packet includes a few dissimilar backgrounds to create a longer animation
- Homo Running, Blastoff Aqueduct
- Wendigo monster walking with alpha channel
- Halloween Curtain
- Fog - no longer available

A Note About DIY Greenscreen Video
Making alpha channel video is a fleck tricky, requiring a special backdrop, lighting setup, and shot preparations. The footage will also need some finessing to remove the figure from the chroma-key background before you combine it with the blitheness. That said, here are a couple of helpful tutorials to help build up your green-screening skills if you desire to go the DIY road.
one. How to Create a 2nd Scene with 3D Depth
Pace one
Open your 2D background scene in Cartoon Animator. To do this go to yourScene Directorand navigate through the different scenes available. For this tutorial, we'll exist using the Halloween themed scene! Double-click on the scene to open it upward.


Step 2
Yous tin also import your own custom scene if it has been created using layers in Adobe Photoshop. Only click and drag your PSD file into Cartoon Animator and chooseScene.


Pace 3
Opening upwards your scene volition show y'all the default camera view.


Step four
In order to view the 3D view, click on the3D Viewbutton on the peak carte bar. To navigate within the 3D view utilize the following:
- Camera Rotate: Click-and-Agree the Correct Mouse Push button
- Camera Pan: Click-and-Concord the Left Mouse Button


Footstep 5
To motility and edit the scene, simply click on one of the layers and a coloured widget will announced. From there y'all can choose i of the coloured arrows to move the layer in any of the directions that y'all cull.

Step vi
In one case you are happy with the organisation of your 3D scene, click on the 3D Viewpush button on the summit menu bar once more to return to the default camera view.
Here you lot tin can test out the 3D parallax outcome past holding theALTcentral on the keyboard and clicking and dragging theLeft Mouse Button to motion the camera effectually. You can also apply the mouse bicycle to zoom in and out to check how the scene will breathing with different camera animations.
2. How to Breathing the 2D Groundwork Movie in Cartoon Animator
For this case nosotros've simply added a camera zoom blitheness, which is done by using the following steps. Our final animation is a live-action person running away from a horde of animated monsters, so to emphasize that action we'll first set the background to requite a little flake of movement to the shot.
Footstep one
Click on theCamera Record Modebutton at the meridian of the screen.


Stride 2
Open the timeline at the bottom of the screen by pressing the Prove Timeline (F3) button.


Step 3
Select thePhotographic camerafrom the timeline options to open the camera keyframes.


Step iv
Creating a Keyframe at the offset of the timeline past zooming the camera in using the mouse wheel (if this doesn't create a keyframe, double-click on the timeline to create it).


Stride 5
Motion the timeline forward a few seconds and then, using the mouse wheel to zoom out, create a 2nd keyframe (if this doesn't create a keyframe, over again double-click on the timeline to create information technology).


Step half-dozen
Select both keyframes and then correct-click on them to choose Transition Curve. SelectSmoothenfrom the list.


3. How to Consign the Transparent 2D Background Moving picture From Drawing Animator
Step 1
To export your project get to the top card bar and select Render > Render Video.


Step 2
This will open up up theRender Settingswindow where y'all tin can choose how to export your video or image.
Brand certain to select the Transparent Videocheckbox to keep the transparency. Y'all will also need to select the .MOV selection nether Format.


Step 3
Likewise await through the other options hither that you would like to edit, such every bit the output size and output range. Once you lot are happy with your selection, click on the Exportpush to choose the location to save your video file. Once it has finished rendering, yous will have a video file that you can use to import into your Adobe Later on Effects project.


4. Import Transparent .MOV Files in Adobe Afterward Furnishings for Animation
Step 1
Now that we accept all our exported video file ready, it is fourth dimension to take it into Adobe After Effects where we can merge our cartoon background with alive action video footage.
In Adobe After Furnishings, import the character video by going to File > Import > Fileand selecting the MOV video file you just exported from Cartoon Animator.


Pace 2
Importing the file volition prompt a new window where you must decide how to translate the alpha channel. Select Straight - Unmattedand click OK.


Pace 3
In one case you accept imported the drawing background video you will notice it located in the Project Console, which is usually located on the left side of the screen.


Footstep iv
Import the live action video files y'all downloaded from Envato Elements by going to File > Import > Fileand selecting the video files.
In one case imported, you volition too notice the video files in the Project Panel.


v. How to Compose the Scene in After Effects
Footstep i
Create a new composition past going toComposition > New Limerick (Control - Northward).


Step 2
In the composition settings, utilise the post-obit:
- Limerick Name: Render Comp
- Width:1920 px
- Height:1080 px
- Frame Rate: 30 frames per second
For theDuration,this can be changed to adapt the length of your cartoon animation and live action video file.


Stride 3
Utilise the mouse to drag and drop each movie file into the composition, making sure that you layer the videos correctly. In order to make the live action grapheme announced in the video it needs to be layered on top of the 2d background. Here is the listing of layers in order:
- Fog
- Halloween Curtain
- Human Running
- Wendigo Monster 1
- Wendigo Monster two
- Wendigo Monster three
- Background Mov


Step 4
Make any adjustments to the layers past going into theTransformoptions of each layer to resize and reposition if necessary so that they are all scaled appropriately compared to the residual of the scene in the 2nd animated background.


Step 5
Create position keyframes for each live activeness grapheme so that they follow the move of the second animated background.
This volition demand a lilliputian trial and error to become correct, so go along adjusting the animations and utilise thePlay Previewbutton until information technology looks correct.


vi. Employ Adjustment Layers to Blend Animation Components and Scene
Now we'll adjust each element and then that the characters look like they belong together in the same scene. We've given things a chip more contrast and cool bluish wait, simply adjust to your tastes.
Step ane
Create an adjustment layer by going toLayer > New > Adjustment Layer, and then brand sure that the layer is placed at the very top of all the other layers.


Footstep 2
In theEffects & Presetspanel, search forPhoto Filterand add it to the aligning layer past double-clicking on it (or clicking and dragging it on to the layer).


Step 3
Get to the Issue Controlsconsole and select the following:
- Filter: Cooling Filter (82)
- Density:25%


Stride iv
In theEffects & Presetspanel, search forLevels and add together it to the adjustment layer by double-clicking on it (or clicking and dragging it on to the layer).


Step 5
Go to the Effect Controlspanel and play about with slider controls on the Histogram to get amend dissimilarity.


Step 6
Create aBlack Solidby going toLayer > New > Solid.


Stride seven
Double click on the Ellipse Toolto create a black ellipse shape.


Step 8
Change the mask mode toDecreasethen adjust theFeathervalue to blur out the edges. For this example nosotros have used the value 663.


Awesome! You're Finished!
Congratulations! And that'south how you lot can merge alive action video with 2D animated backgrounds using Adobe After Effects and Cartoon Animator. Feel free to use multiple characters or your ain designs and footage to create your own video combinations.
I hope you've institute this tutorial useful and I'll see you next time, here on Envato Tuts+!
More Cartoon Animator and Afterward Effects Animation Tutorials
Source: https://photography.tutsplus.com/tutorials/how-to-mix-real-character-into-2d-animation--cms-38467
Posted by: spatesbrin1959.blogspot.com
0 Response to "How To Make Your 3d Animation Characters Look 2d"
Post a Comment